
Otherwise known as Division R Textiles; Class 11; Pillowcases

If you will recall, A blogging friend alerted me to this fabric featuring skydiving bunnies. I promptly authorized her to buy me lots and lots of it. I wanted to make pillowcases out of this border print.
Here is an all-over photo showing lots of activity on the ground with lots of blue sky up above.
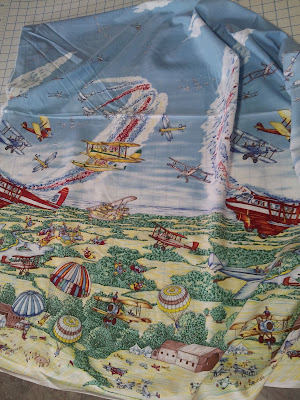
And now they are pillowcases.
"Spectacular Fun For Everyone" is this year's fair motto.
I think these bunny rabbits are having spectacular fun. Don't you?


 |
| Back side is the top of the border. |


1. Fold your trim piece in half lengthwise and iron it.
2. Take your cuff piece and lay it flat with the right side up.
3. Match the raw edge of the trim to a raw edge of the cuff. Baste a 1/4" seam.
4. Take your Main body piece and lay one raw edge on top of the raw edge of the seam you just sewed so the main and the cuff are right sides together (RST). Baste this seam at 1/4".
5. Now, go to the other end of the main body and start rolling up towards the seam you just sewed.
6. When you get it into a tight little tube, bring the other raw edge of the cuff piece up and over your tube of main body fabric. Match that last raw edge to the raw edge of your last seam and sew at 3/8" seam allowance. ( This bigger SA is to make sure you cover all those wandering basting thread stitches if you sew as fast as me.)
7. Optional; Serge off the fraying threads. Serging adds more durability to this seam.
8. Take your rolled up tube and pull the main body out - turn it inside out.
You'll now have a big piece of material with a cuff attached and no raw edges to fray.
9. Fold this big piece in half wrong sides together (WST) - we are doing a french seam here to also enclose raw edges. Match the trim and cuff area and sew a few stitches here to make sure it stays even.
10. Start in the back corner and sew a 1/4" SA to the next corner and turn to come down the long side down to the cuff. If your trim area is buckling slightly, gently stretch the offending fabric into place. Sometimes the two layers of fabric feed differently. Finish at the cuff end by backstitching a few stitches.
11. You can trim this first seam if you want. I don't.
12. Check that the trim piece is lined up evenly at the inside before you proceed. If you need to re-do this area to get trim to line up, get out your seam ripper.
13. Turn inside out and press. The fabrics should be RST now as we make our french seam.
14. Seam allowance at 5/16 - 3/8", start in back corner and turn and come to cuff area. One pillowcase behaved and the trim pieces stayed even, The second one got snarky and I had to rip out my stitches at trim area twice before I got smart. Pin carefully trying to keep trim piece even and matched up. Sew just a few stitches in this area and then do your french seam.
15. Turn and use your preferred tool to push out corners. Give it some good squirts of Mary Ellen's Best Press and iron well. Ta Da. Blue ribbon worthy.

If I can find a coordinating fabric, I can make two more pillowcases. I had somebody in Norway contact me to see if she could buy some this skydiving bunny fabric. I sent her 1/2 yard and told her to Pay It Forward. I have just enough left for two Main bodies but not enough to make the cuff.
I might use white. I'll have to see.
I actually looked at the online fair booklet ahead of time this year. I have one or two more items to finish before Saturday when I need to drop everything off at the fairgrounds for judging and display. Those unfinished items are UFO's and need a kick in the butt to leave my sewing room.


Stunning! You had a great vision to see awesome pillowcases from the fun and busy print! They turned out better than I had imagined. Good luck making your fair deadline. Just think how great it will be to see blue ribbons on all of your entries!
ReplyDeleteI'm racing to try and enter a pair of work shorts too!
DeleteLove the pillowcases! I think I've tried that method - but doesn't it leave the pillow exposed at the opening? I prefer mine with the extra flap to hide it. It's a very satisfying make though as I can't follow the logic at all!
ReplyDeleteThat flap is a euro thing. We leave 'em open on bed pillows.
DeleteBlogger is sometimes like the crazy neighbour who is going to do things HIS way no matter what you say. I've had the photo problem too - Blogger says it'll be "this" way, and won't budge. Very annoying.
ReplyDeleteCute fabric = cute pillowcases - that's an adorable print!